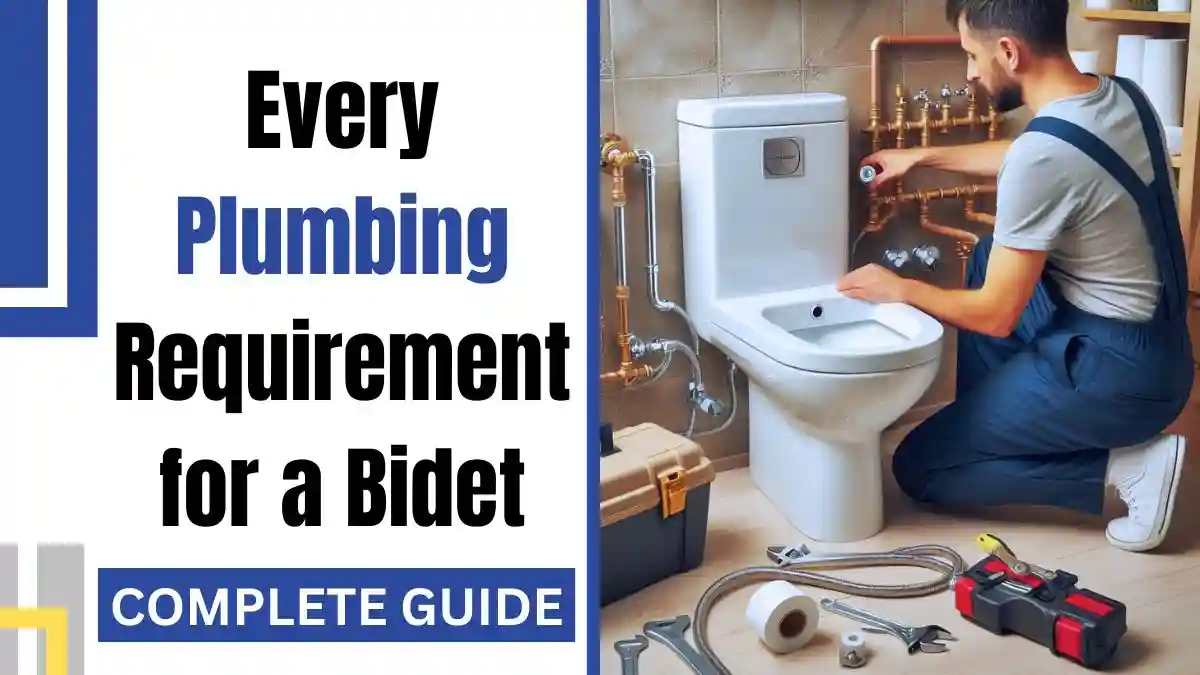
Today’s article looks at the different plumbing requirements for bidets. There are several types of bidets on the market these days and the kind you’re planning to get will determine the ideal bathroom setup and plumbing needs.
Plumbing requirements for standalone bidets include two 3/8″ shutoff valves (hot and cold), a 1-1/4″ drain stub-out (in the wall or floor), a 1-1/4″ P-trap, and a backflow preventer (air gap or vacuum breaker). Bidet seats, attachments, and sprayers need only a single 3/8″ shutoff valve.
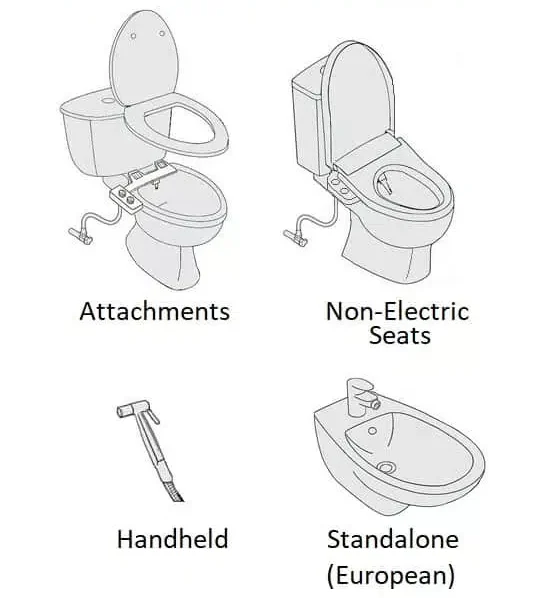
So, it depends on the type of bidet you have. What we’ll do here is go over the different plumbing requirements for different bidets paying special attention to the standalone kind as they have a more involved installation. Standalone bidets are the separate washbasins located next to toilets.
Some modern non-electric bidets (attachments and handheld sprayers) can be installed into the home’s plumbing and we’ll be going over the requirements for these as well.
In case you’re new to the subject, here’s a quick rundown on the different types of bidets.
Electric Bidets
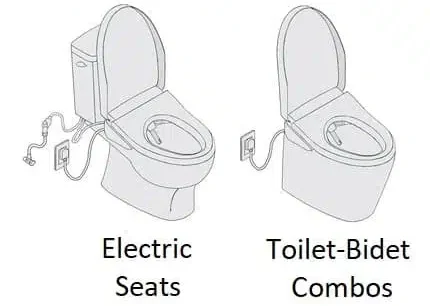
Non-Electric Bidets
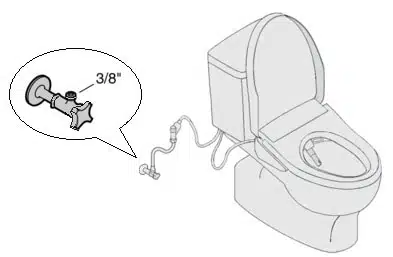
One Shutoff Valve (Bidet Seats, Attachments, Handheld Sprayers)
For modern bidets and handheld sprayers, you’ll need a shutoff valve low on the wall, usually to the left of the toilet.
People who are used to using standard flush tank toilets (the most common kind) often take this requirement for granted.
Bathrooms that typically lack toilet shutoff valves include:
- Concealed cistern toilets. These are usually referred to as “wall-hung”, but some flushometer toilets (which are truly tankless) are wall-hung. Concealed cistern toilets are mounted on the wall and have a tank hidden behind the wall that they’re mounted on. With this type of toilet, you have zero external access to the water that feeds the tank.
- Flushometer toilets. This type of toilet is truly tankless. They’re installed in buildings that have sufficiently powerful plumbing to allow for easy toilet bowl clearance in a single flush. Contrary to what a lot of people think, this type of toilet is not limited to public restrooms.
Toilet shutoff valves provide external access to a water connection close to the toilet. They’re often the same as the valves located beneath the bathroom sink.
A supply hose runs from the shutoff valve to the toilet fill valve where it sends water into the tank. When you purchase a bidet attachment, seat (electric or non-electric), or handheld sprayer, the item will come with a T-connector (often called T-valve, T-adapter, Y-valve, etc.).
The T-connector diverts some of the water from the shutoff valve to the bidet seat. When installing the bidet, the connector is threaded onto the fill valve. The shutoff valve supply hose is attached to one inlet on the connector, while the bidet supply hose connects to the other. This allows both the tank and the bidet to receive enough water.
Again, folks who have used regular flush tank toilets their whole lives would probably think DUH! If you’re like me, then you grew up on a regular 2-piece flush tank toilet and didn’t realize there was another kind for home use.
I always thought that tankless flush valve toilets (what they call flushometers), were strictly limited to public restrooms, and they certainly are more common in non-residential applications. Again, they require more powerful plumbing than what most residential buildings offer—plus they’re super loud. But many residential properties do have this type of toilet.
What’s much more common in homes and apartments are the concealed cistern wall-hung toilets. For this type, you’ll probably want to have a plumber install a shutoff valve next to the toilet.
Warm Water Non-Electric Bidets
As mentioned above, non-electric bidets can be installed directly into the home’s plumbing. With these bidets, most people just use cold water. “Unheated” would be more accurate because tap water isn’t necessarily cold. It depends on the location and climate.
For those who want temperature control with a non-electric bidets, there are options.
Option 1: The Easy Method
The easiest option is to hook the bidet directly to the sink faucet and some handheld sprayers come with the correct adapters/attachments.
Pros
- Zero installation. The main benefit of this method is that it’s easy to set up.
- Rental-property friendly. All modern bidets (seats, attachments, and sprayers) are rental property-friendly because their installation is 100% reversible. But some prefer not to tamper with anything in a rental property and opt for a zero-installation bidet. These include portable/travel bidets, and faucet bidets.
- Doubles as a travel bidet. These aren’t truly portable because you can’t use them in public restrooms but they are travel-friendly because they can be easily packed and fit most faucets. For this purpose, you’ll probably want several different adapters on hand to fit different sink sizes.
Cons
- Long-term inconvenience. These are easy to use in that they don’t require an actual installation but they’re more trouble long term because you have to fiddle with the bidet with each use. Most handheld sprayers are installed only once in a process that takes 10-15 minutes. With this kind, you have to fool with hooking it up every time.
- Can’t be used as a traditional sprayer. To control the temperature, you need to be able to reach the valves. Unless your toilet is really close to the faucet, reaching the nozzles to adjust temperature and pressure from where you’re sitting is impractical. Even if you can reach the faucet, it would still be pretty awkward. Instead, you’ll need the right temperature and pressure dialed in before sitting down.
Option 2: The Alternative Shutoff Valve Method
Most don’t want to have to deal with connecting and disconnecting the bidet to the faucet with each use, and instead, install the attachment using an alternate shutoff valve.
This can be done by using the hot and cold shutoff valves beneath the sink.
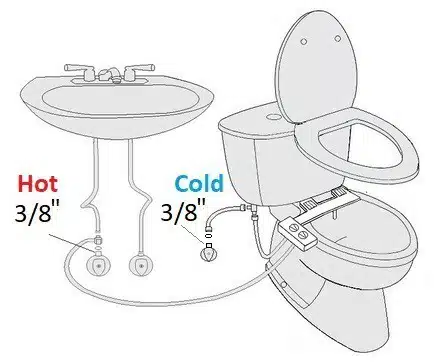
Ideal bathroom setup:
- A toilet and sink that are close enough together. If they’re not close together, then you’ll have to get an extension hose. Check with the manufacturer of your bidet to see if they make a longer hose. Alternatively, you can get an equivalent hose and attach the two using some sort of adapter.
- A toilet and sink on the same side of the wall or at a 90-degree angle. If the toilet and sink are on opposite sides of the wall, the hose would form a tripping hazard.
- A pedestal sink. The supply hose running from your bidet needs to reach the shutoff valves beneath your sink. Sinks are often connected to vanities which makes this difficult but not impossible. If you have a vanity around your sink and own the property, you can drill a hole into the cabinet—in the same way that you would put a hole in an entertainment center to route electrical cords and cables to the nearest outlet. If you’re a renter or don’t want to permanently alter your furniture, you can run the supply hoses through the opening of the vanity. This would be an eyesore but it’s still an option.
Option 3: TRUSTMI Bidet
As far as I know, the alternative shutoff valve method is limited to bidet attachments and non-electric seats. I’ve never used it, but a brand called TRUSTMI puts out a handheld bidet that comes with equipment that allows the sprayer to be installed directly into the home’s plumbing.
Once I’ve had a chance to install and use it, I’ll update this section.
Rough-In Installation Requirements for Standalone Bidets
Rough-in requirements pertain to the size and location of the pipes beneath the floor and within the walls.
Bidets come with their own rough-in requirements. So, to install a specific bidet, the supply and drain pipes in your walls and floors will need to be in the right place and of the correct size.
Two 3/8″ Shutoff Valves(Standalone Bidets)
Standalone bidets are installed with two shut-off valves, one hot and one cold.
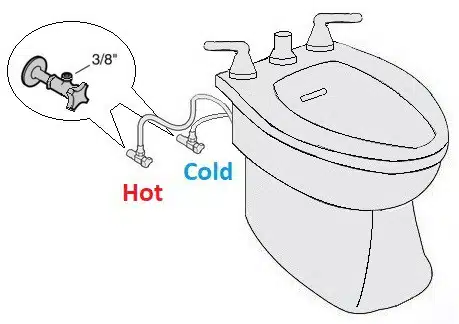
Like the ones under your sink that feed water to the bathroom faucet, these send hot and cold water to the bidet faucet.
Even wall-hung and back-to-the-wall bidets (the kind that conceals water connections) make use of shutoff valves.
They’ll need to be situated low on the wall behind where the unit will go. It varies depending on the brand and model, but the valves are usually spaced about 6” (or 152mm) to the right and left of the bidet centerline.
The 3/8” threaded portions attach to the risers that run from the valves to the faucet and are connected by compression unions. During installation, ensure that you connect the hot and cold risers to the right ports on the faucet.
Even vertical spray bidets (the kind that shoots water up from the bottom of the basin) use in-wall water supply pipes/shutoff valves.
The minimum size for a water supply pipe to bidet (via shutoff valves on the wall) is 3/8” according to IPC code and 1/2” per the UPC. IPC stands for International Plumbing Code while UPC stands for Uniform Plumbing Code. In North America, it’s typically 3/8”.
A 1-1/4″ Drain Pipe In the Floor or Wall
Like sinks and baths, standalone bidets require a drain outlet (or drain line) to dispose of used water. Drain pipes for sinks are usually 1-1/4” or 1-1/2” while those for bidets are almost always 1-1/4”.
Though bidets are used alongside toilets, the function of their drains has a lot more in common with that of sinks. Like sinks, bidet drains are used for rinsing and not for solid waste disposal. Hence, bidet drains are small at 1-1/4” in diameter, compared to the 3” diameter drain pipes installed on most toilets.
But it can vary…
Drain pipe sizes (for all fixtures) are based on a few factors:
- Plumbing codes for pipe sizing. Different fixtures require different pipe sizes and the smallest allowable size in a drain-waste-vent (DWV) system is 1-1/4”.
- The contractor’s preferences. When it comes to most bathroom fixtures, contractors tend not to install piping any smaller than 1-1/2” but sinks and bidets are an exception.
- Drilling and notching codes. Many notching and drilling codes don’t allow large enough holes to accommodate a 1-1/2” pipe, so a 1-1/4″ is used instead. This is usually the case with sinks and bidets.
In other words, contractors choose pipe sizes first by looking at codes and then adjusting upwards based on their preferences if possible. Bidets tend to be 1-1/4 but other sizes are used from time to time.
While most standalone bidets will connect to a 1-1/4” drain pipe, you may run into a larger size here and there—often 1-1/2” though I’ve heard of instances where 1-5/8” was used.
Because 1-1/4″ is the most common, the P-traps made for standalone bidets are usually 1-1/4”. If you have your eye on a particular bidet model, make sure to check the size of the P-trap it comes with. Whatever size drain pipe you’ll be using, the P-trap will have to match.
This brings us to the next subject.
A 1-1/4″ P-Trap or S-Trap
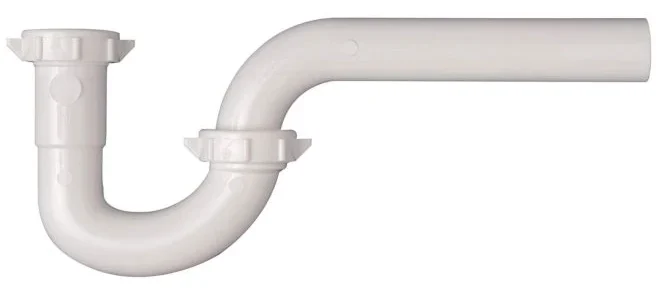
Like other bathroom fixtures, bidets are connected to P-traps (or S-traps) to prevent the backflow of stinky odors from sewer and septic systems (by the way, it turns out bidets are good for septic systems).
The trap size for bidets is typically 1-1/4”.
In the past, we looked at how faulty or missing P-traps are usually the culprit of bad-smelling standalone bidets.
Bidets are connected to the drainage system in much the same way as bathroom sinks: the fixture’s tailpiece attaches to a trap and the trap attaches to the drain pipe.
When we get into the specifics there are some differences like different rough-in requirements and the location where the trap attaches to the drain pipe. Both types of fixtures can be drained into the wall or floor but sinks typically drain into the wall while bidets seem to be much more variable.
Drain Pipe and Trap Location
Make sure to read the rest of this section, but the upshot is that you’ll want to purchase a standalone bidet that has a drain assembly that’s compatible with the location of the drain pipe you’ll be using.
The trap location depends on whether the drain pipe extends from the wall or the floor. The drain pipe will stick up from the floor (stub-up) or jut out from the wall (stub-out). The stub (a short section of pipe) sticks out from the floor or wall where it is connected to the fixture during the fixture’s installation.
For fixtures in general, whether the stub extends from the wall or floor is determined by the type of fixture and whether the pipe serves as a drain or water supply. For example, tubs and showers drain into the floor while sinks often drain into the wall (though they can be plumbed into the floor).
With bidets, it depends.
Wall Drain
Two setups are common when a wall drain is used.
The P-trap is connected to a drain arm that extends through the back of the bidet to the wall. This setup is more common on floor-standing bidets that are up to 6″ from the wall.
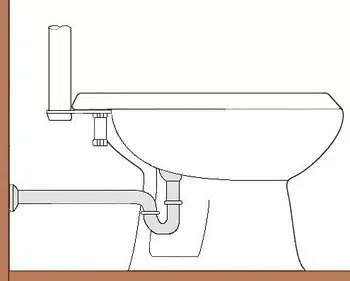
Bidet attached to a drain arm in the wall. The P-trap fits between the drain arm and fixture drain tailpiece.
In my experience, most are installed closer to the wall.
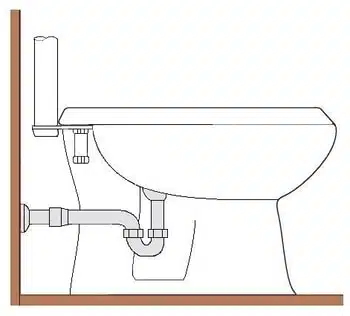
The P-trap is situated between the fixture tailpiece and the wall drain behind the bidet.
Floor Drain
If the drain is routed through the floor, there are a couple of options.
One is where the p-trap is installed beneath the floor where it connects to the drain tailpiece on the bidet.
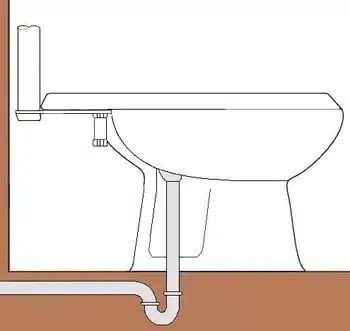
Bidet attached to a P-trap through a floor drain outlet.
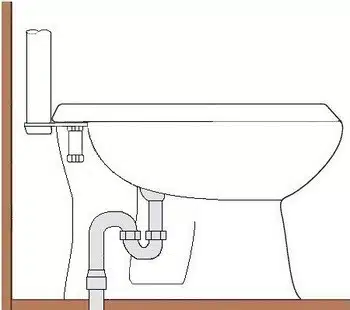
Alternatively, an S-trap can be used which removes the need for a P-trap to be installed beneath the floor.
The S-trap fits between the fixture tailpiece and the branch drain line.
In situations where a bidet led to a bathroom developing a sewer-like smell, I suspect the smell probably resulted from a false assumption (on the part of the installer) that a P-trap was located beneath the deck.
Wall vs. Floor Drain
One thing that determines the compatibility of a standalone bidet with a bathroom’s plumbing is whether the bidet is floor-standing, wall-mounted, or back to the wall.
Floor-Standing Bidets
These have at least 6” of space between the back of the wall and the bidet. In my experience, these are flexible in that they can be connected to a drain pipe on the floor or wall per the property owner’s preference.
Wall-Mounted Bidets
These provide a clean minimalist look by concealing all of the water connections. Hence, you need a drain outlet on the wall behind where the bidet will be mounted.
Back-to-the-Wall Bidets
Per the name, this type of bidet is positioned directly against the wall. However, it’s not mounted on the wall, so a floor drain can be used.
A Backflow Preventer
IPC plumbing codes dictate that bidets need to have a backflow preventer like an air gap or vacuum breaker (reference).
The type of backflow preventer used depends on the type of bidet. With standalone bidets, horizontal spray units use air gaps while vertical spray bidets use vacuum breakers or special pipework. Handheld bidets also use vacuum breakers.
This requirement is often taken care of by bidet faucet manufacturers. But faucets and vacuum breakers are usually sold separately, so it’s worth mentioning.
Standalone bidets can be divided into several categories, but the main distinction is usually made between vertical spray and horizontal spray bidets.
Horizontal spray (aka over-the-rim) bidets have a traditional sink-like faucet that pours water into the basin. Vertical spray (or ascending spray) bidets have a water jet at the bottom of the basin.
Air Gaps (Horizontal Spray Standalone Bidets)
Faucets are usually sold separately (from the bidet basin) so make sure you purchase a faucet that’s compatible with your unit. It should both fit and provide an air gap.
For our purposes, an air gap is an unobstructed space between the bidet faucet and the rim of the basin.
Like sinks, over-the-rim bidets have faucets that pour water into a basin from above. The faucet is located above the basin, so even if the bidet were to overflow, the water wouldn’t be able to flow back through the faucet.
Plumbing codes dictate that the vertical space below the spout be above where the water would overflow (the rim) and that the space remains unobstructed.
The air gap will take care of backflow prevention, but vacuum breakers are often installed on appliances for good measure even when they’re not likely to be needed.
Vacuum Breakers
A vacuum breaker is one of several devices that can prevent backflow when an air gap can’t be used. It’s what’s known as a “reactionary device” that serves to break the vacuum in a piping system when backflow conditions are present.
They prevent the water that leaves the faucet from re-entering the same nozzle and flowing back in the other direction. The backflow, if it occurred, would contaminate the water supply with used/soiled water.
Vacuum breakers prevent back siphoning which is the backflow of used, polluted, or contaminated water from a plumbing vessel or fixture into a potable water supply due to negative pressure in the pipe (reference).
A lot of faucets have integral vacuum breakers but they’re most important/common in situations where an air gap can’t prevent backflow, such as with outside hoses and sprayers.
Vacuum Breakers on Vertical Spray Standalone Bidets
Codes require vertical spray bidets to have vacuum breakers because the faucet is in the bowl, and thus located below the flood level rim.
The bidet discharges water from a sprayer at the bottom of the basin so the nozzle routinely becomes submerged in the bowl which can lead to contamination of the water supply if backflow prevention measures aren’t taken.
Faucet assemblies sold for this type of bidet usually come with an integral vacuum breaker and the bidet itself should have a dedicated hole behind where the faucet goes.
If there isn’t a dedicated hole, the water supply must be installed to accommodate a vacuum breaker. Shutoff valves can be found for this purpose, or you can install a vacuum breaker in the rough-in piping serving the bidet.
Vacuum Breakers on Handheld Bidet Sprayers
Handheld bidets often come with vacuum breakers for attachment to the supply hose. Not every handheld sprayer has one. If yours doesn’t, you can install a shutoff valve on your wall with a built-in vacuum breaker and it will be just as effective.
Special Pipework (Vertical Spray Standalone Bidets)
For a while, horizontal spray bidets were the most popular because they’re much easier to install without special fittings or any fancy pipework.
As mentioned, vertical spray bidets have nozzles that become submerged and thus pose a risk of contaminating the water supply.
One accommodation that newly built properties would make to install vertical spray bidets was to have a separate dedicated cold-water supply for the bidet along with a hot water supply running via separate distribution pipes away from other draw-offs.
This separate piping allowed contractors to meet water regulations requirements and prevent the possibility of contamination.
I bring this method up last because there are easier ways to accomplish the same thing. Sure, it is more robust than the vacuum breaker method and provides protection like that of using an air gap. But a simple vacuum breaker is sufficient to meet code requirements and should be considered plenty effective.
Rough-In Dimension Requirements for Standalone Bidets
According to IPC codes, bidets have the same requirements as toilets, urinals, and sinks:
- There can’t be any less than 15” (381mm) from the bidet center to any obstruction such as a side wall, vanity, or partition.
- Measuring center-to-center, there can’t be any less than 30” (762mm) between the bidet and any adjacent fixtures.
- There has to be at least a 21” (533mm) of clearance in front of the bidet to any fixture, wall, or door.
So, there’s no requirement for the space behind a bidet. Hence, back-to-the-wall and wall-hung units can be installed.
Bidets Are Supposed to Have Water Temperature Limiting Devices
Plumbing codes specify that bidets have to be installed with a water temperature limiting device that limits the discharge water to 110°F (43°C).
I say “supposed to” because people do get scalded with these things from time to time. For endless warm water that poses the least risk of scalding, you may want to look into bidets with tankless water heaters.
Also, I’m pretty sure that this requirement was written with standalone bidets in mind and any warm water attachments/sprayers that source warm water from the home’s plumbing system.
Most non-electric bidets are meant to use cold water. Electric bidets come with a water heater housed inside the seat that’s supposed to limit water temperature to a range of around 95 ̊F (35 ̊C) and 104 ̊F (40 ̊C).